
Synthetic transaction monitoring runs a scripted user journey - open the login page, sign in, add a product to the cart, call an API - on a schedule, and checks every step. In AllInOneMonitor a Transaction monitor chains up to 20 HTTP requests that share cookies and pass values from one step to the next, and a Browser monitor loads a page in real headless Chrome when JavaScript matters.
Key takeaways
- A homepage that answers 200 says nothing about whether customers can sign in or pay; a multi-step check does.
- Transaction steps share one cookie jar, so a session started at login carries through every later step.
- Extract rules pull CSRF tokens, IDs and headers out of one response and reuse them in the next request.
- When a step fails, the error names it, and the remaining steps are shown as skipped.
- Pages that work only after JavaScript runs need a Browser monitor instead.
What a simple uptime check cannot see
Most outages that cost money are partial. The homepage loads, so the uptime check is green, but sign-in returns an error after a session store filled up, or the cart page throws an exception after a plugin update. Customers notice within minutes; a single-URL monitor never does.
Synthetic monitoring closes that gap by acting like a visitor. Because the journey runs on a schedule from your monitoring locations, it also catches problems at night and on weekends, when real traffic is too thin to raise alarms on its own.
Transaction or Browser monitor?
| Transaction | Browser | |
|---|---|---|
| What runs | A list of HTTP requests in order | A real headless Chrome or Chromium |
| Best for | Login monitoring, multi-step forms, API flows | Pages that render with JavaScript, page speed |
| Checks | Status codes, text, time, JSON rules per step | Text, a CSS selector, page load and LCP limits |
| Measures | Time per step and in total | FCP, LCP, layout shift, requests, failed requests, console errors |
| Needs | Nothing extra | Chrome or Chromium on the location that runs it |
Transactions are light and fast, so they suit short intervals. Browser checks start a fresh browser every time and cost far more CPU and memory; the documentation recommends an interval of 5 minutes or more for them.
Build a login monitor step by step
- Open Monitors, click Add monitor and choose Transaction under What to monitor.
- In the Start URL card, enter your site, for example
https://shop.example.com. Relative step URLs such as/loginare resolved against it. - Fill in Username and Password for a dedicated test account. They become the variables
{{username}}and{{password}}. - In the Steps card, click Add step for each request and fill in its Name, Method and URL, then the Request, Expect and Extract parts.
- Use the arrows to reorder steps and × to remove one, then save and let the first run complete.
If you already have a list of pages, paste them under Import steps from a list of URLs and press Add these as GET steps; you can then add checks to each one.
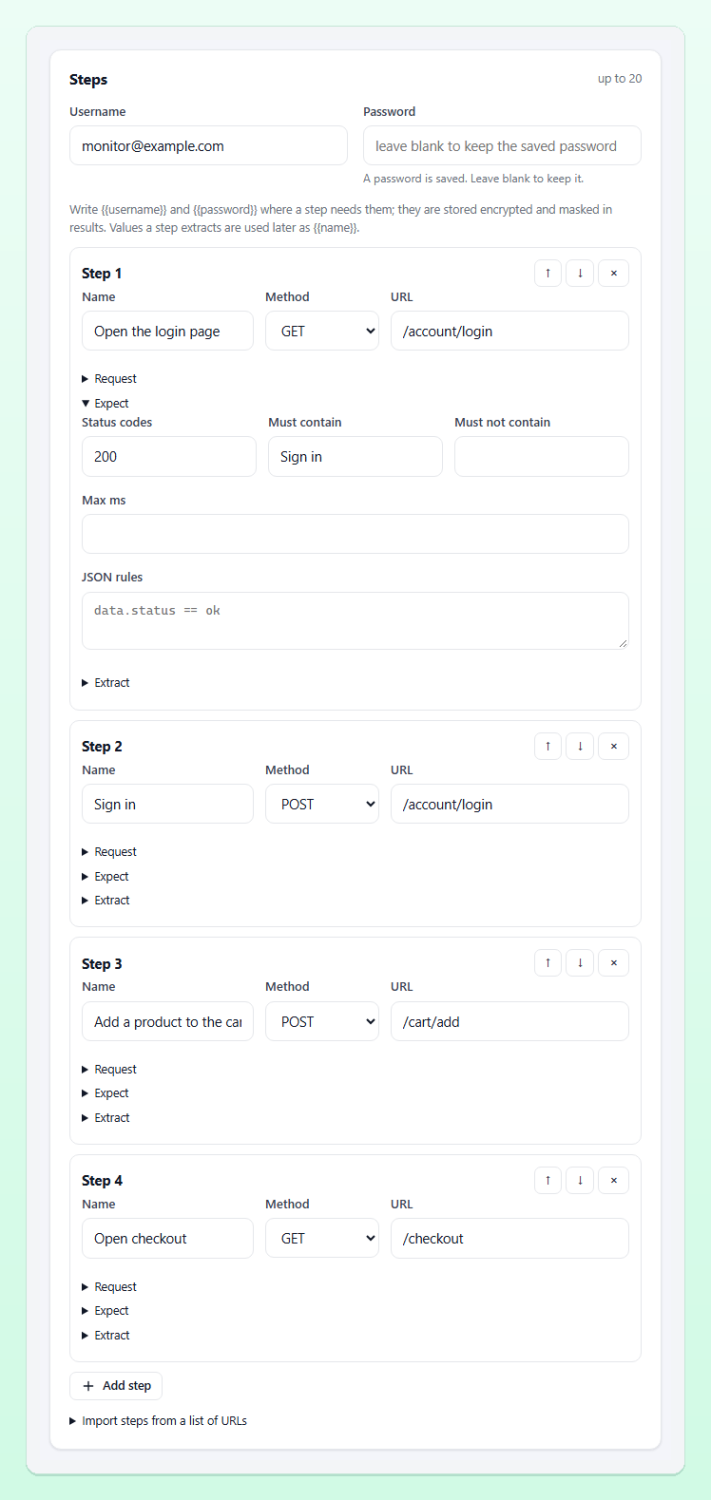
Step 1: open the login page and keep its CSRF token
Most login forms carry a hidden token that must be posted back. Set step 1 to GET /login, expect status 200, and add one line under Extract:
csrf body-regex name="csrf" value="([^"]+)"Each extract rule is variable source expression. The source is body-regex (the first capture group), json (a dotted path such as data.token), header or cookie. If the rule finds nothing, the step fails with a clear message instead of carrying on with an empty value.
Step 2: sign in
Set step 2 to POST /login with these Form fields:
username={{username}}
password={{password}}
csrf={{csrf}}
Keep Follow redirects on, so the redirect after a successful login is followed with the session cookie. Under Expect, set Must contain to text that appears only when signed in, such as "Sign out", and Must not contain to your error text, such as "Invalid password".
Step 3: prove the session works
A GET to /account with Must contain set to the test user's name confirms that the session cookie is accepted on a protected page. Add Max ms if this page should stay fast.
Tip: Never type the real password into a step. The password field is stored encrypted and masked as *** in results, but steps are not encrypted, so the form refuses steps that contain the password in plain text. Write {{password}} instead.
Checkout monitoring without placing real orders
Every step is a real HTTP request, so a step that submits an order really submits it. For checkout monitoring, design the journey to stop just before money moves:
- add a test product to the cart and check that the cart shows it;
- open the checkout page and check that the payment options are rendered;
- for a JSON checkout API, call the quote or shipping endpoint and validate the answer with JSON rules such as
data.total > 0; - stop there, or end with a request that empties the cart.
JSON rules use the same syntax as API monitors; our guide to API monitoring with JSON assertions lists every operator. For a single page whose text must not change, a keyword monitoring check is simpler.
Reading the results
The monitor page shows a Transaction steps table for the newest run: step number, name, method and URL (and where redirects ended), status code, time, and Passed, Failed or Skipped with the reason. The response time of the check is the sum of all steps, so the usual response-time chart shows when the journey as a whole slows down. A failed check names the step, for example:
Step 2 "Sign in" failed: text "Welcome" not foundThat message is what arrives in your alert channels, so the person on call knows at once whether login, cart or checkout broke. To follow slow steps over time, pair the journey with response time monitoring on the key pages.
When you need browser monitoring instead
Transactions speak HTTP only. If your login form is built entirely by JavaScript, or content appears only after scripts run, the HTML the transaction receives will not contain what you expect. A Browser monitor opens the Start URL in headless Chrome with an empty cache, waits for the load event, and then checks Page must contain, CSS selector must exist (for example #checkout-button), Max page load (ms) and Max largest contentful paint (ms). With Keep a screenshot when the check fails on, you also get a picture of what the visitor saw.
Browser checks need Chrome or Chromium on the location that runs them. A location without it reports that instead of a result, so place browser monitors on a location that has a browser installed. Details are in the synthetic monitoring documentation.
Limits worth knowing
| Item | Limit |
|---|---|
| Steps per transaction | 20 |
| Extract rules per step | 10 |
| Redirects followed per step | 5 |
| Run time | Each step within the monitor's timeout; the whole run within twice the timeout (30 to 180 seconds) |
Variables cannot be used in the host name of an absolute URL, and the form refuses a step that uses a variable no earlier step extracts. The other monitor settings, such as interval, confirmations and locations, work as for every monitor type. How many monitors and locations you can use depends on your plan; see Pricing.
Frequently asked questions
What is the difference between synthetic monitoring and real user monitoring?
Synthetic monitoring runs scripted journeys on a schedule, so it works even when nobody is visiting. Real user monitoring measures actual visitors' sessions. This product does synthetic checks: transactions and browser monitors.
Can a transaction monitor log in to a site with a CSRF token?
Yes. Extract the token from the login page with a body-regex rule and post it back as a form field in the next step; the cookie jar keeps the session.
Is my test account password safe in the monitor?
The password is stored encrypted and masked in every stored result. Use a dedicated test account with minimal rights anyway.
How many steps can a transaction have?
Up to 20 steps, each with its own request, expectations and up to 10 extract rules.
Test the journey, not just the homepage
Build a login or checkout transaction in minutes and find out which step broke before your customers tell you.